In part one I built a Proxmox VE node on a free Oracle Cloud Ampere instance, with LXC containers on an internal bridge that can reach the internet but cannot be reached from it. Safe, and a good setup for internal services. But not useful for external exposure.
This post is the other half: giving a container its own public IPv4 address, filtering it properly and as a bonus optionally doing IPv6 without any NAT at all.
Same values as before. The addresses are examples.
1. A container with its own public IP#
The example: private 10.20.0.12 on the VNIC, mapped 1:1 to container 10.20.1.12. Same last octet on both sides, which keeps the NAT rules readable.
                           I N T E R N E T
                                  │
             203.0.113.41 ────────┼──────── primary public IP
            (reserved, 1:1)       │       (shared egress, part one)
                                  │
                      subnet 10.20.0.0/24, gw .1
                                  │
╔═════════════════════════════════╧══════════════════════════════════╗
║ px0-oc  —  one public IP mapped straight through to a container    ║
║                                                                    ║
║   enp0s6   10.20.0.10/24              ← primary public IP          ║
║         +  10.20.0.12/32              ← 203.0.113.41               ║
║              │                                                     ║
║              │  DNAT in    10.20.0.12    → 10.20.1.12              ║
║              │  SNAT out   10.20.1.12    → 10.20.0.12   (1)        ║
║              │  SNAT out   10.20.1.0/24  → 10.20.0.10   (2)        ║
║              │                                                     ║
║   vmbr0    10.20.1.1/24   internal only, never seen by OCI         ║
║    ═════════╤═══════════════════════════════╤════                  ║
║     ┌───────┴───────┐               ┌───────┴───────┐              ║
║     │     CT 102    │               │     CT 101    │              ║
║     │   10.20.1.12  │               │   10.20.1.20  │              ║
║     │  203.0.113.41 │               │ outbound only │              ║
║     └───────────────┘               └───────────────┘              ║
╚════════════════════════════════════════════════════════════════════╝
In: the public IP lands on the VNIC and is DNAT’d straight through to the container. Out: rule (1) sends that one container back out the same address, and it has to sit above (2), the catch-all from part one that every other container egresses on.
1.1 In the OCI console#
- Instance → Networking → the VNIC → IP Administration
- Assign private IP address
- Subnet
10.20.0.0/24 - Manually assign, enter
10.20.0.12, CIDR32 - Optional: a hostname
- Public IP: Reserved public IP → Create new reserved IP address
- Give it a name, for example the external hostname you will use. It is only a label in OCI and does not set reverse DNS: mine has no PTR record at all. If you need reverse DNS, for mail in particular, ask Oracle for it through a support request.
- Assign.
- Subnet
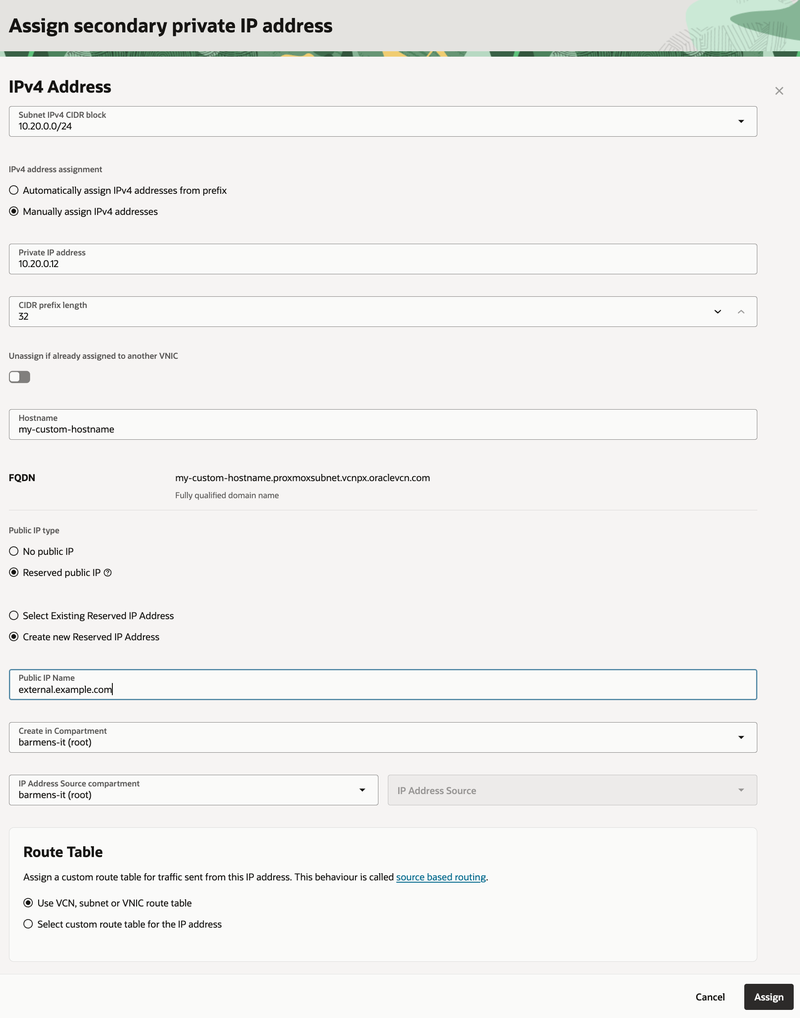
Note the public IP you get back. In the examples below it is 203.0.113.41. Also, when I do this and click Assign the window just stalls and does not close. It still works, just go back and refresh to find the IP.
1.2 On the Proxmox host#
Set HOST, PRIV and CT, then run the block as-is.
HOST=10.20.0.10          # this node's primary address on enp0s6, from part one
PRIV=10.20.0.12
CT=10.20.1.12

ip addr add ${PRIV}/32 dev enp0s6
iptables -t nat -A PREROUTING    -i enp0s6 -d ${PRIV} -j DNAT --to-destination ${CT}
iptables -t nat -I POSTROUTING 1 -o enp0s6 -s ${CT}   -j SNAT --to-source ${PRIV}

sed -i "/^:POSTROUTING/a -A PREROUTING -d ${PRIV}/32 -i enp0s6 -j DNAT --to-destination ${CT}\\n-A POSTROUTING -s ${CT}/32 -o enp0s6 -j SNAT --to-source ${PRIV}" /etc/iptables/rules.v4
sed -i "\\|^\\s*address ${HOST}/|a\\        up ip addr add ${PRIV}/32 dev enp0s6" /etc/network/interfaces

iptables-restore --test < /etc/iptables/rules.v4 && echo "rules.v4 OK"
In order:
ip addr addgives the host the private address the public IP maps to. A/32, since it is one service address and not a subnet.- DNAT is inbound: traffic arriving for
10.20.0.12is handed to the container. No port or protocol match, so all of it. - SNAT is outbound: the container leaves as
10.20.0.12instead of the host’s primary address. - The two
sedlines make both survive a reboot, by writing the rules into/etc/iptables/rules.v4and the address into theenp0s6stanza in/etc/network/interfaces, anchored onHOST, the node’s own address. GetHOSTwrong and the secondsedmatches nothing, silently.ip -4 -o addr show enp0s6prints it: it is the one that is not a/32. iptables-restore --testparses the file without loading it. If it is silent and you getrules.v4 OK, the host will come up with these rules. Do not skip it.
The first sed inserts both rules directly after the :POSTROUTING line, which puts the SNAT rule above the 10.20.1.0/24 catch-all from part one. That order matters: the specific rule has to be evaluated first, or the container egresses on the wrong public IP and you get to spend an evening wondering why your reverse DNS never matches. -I POSTROUTING 1 does the same thing to the live ruleset, where -A would append below the catch-all.
Only the live ip addr add matters today, the file edit is for the next boot. Proxmox also reflows this file whenever you touch networking in the GUI, so check it by eye now rather than finding out later:
sed -n '/iface enp0s6 inet static/,/^$/p' /etc/network/interfacesEvery up ip addr add line should be indented, inside the stanza, above the blank line.
1.2.1 What it should look like#
The /24 and the new /32 side by side:
ip -4 addr show enp0s6 | grep inet
    inet 10.20.0.10/24 scope global enp0s6
    inet 10.20.0.12/32 scope global enp0s6
The SNAT rules in the right order, specific above catch-all:
iptables -t nat -S POSTROUTING
-P POSTROUTING ACCEPT
-A POSTROUTING -s 10.20.1.12/32 -o enp0s6 -j SNAT --to-source 10.20.0.12
-A POSTROUTING -s 10.20.1.0/24 -o enp0s6 -j SNAT --to-source 10.20.0.10
If the /24 line sits above the /32 line, fix it before going further. iptables -t nat -S PREROUTING should show one DNAT rule per exposed container, and sed -n '/iface enp0s6 inet static/,/^$/p' /etc/network/interfaces the new up ip addr add line.
If iptables -t nat -S shows only the four -P policy lines, the rules never loaded. Check systemctl status netfilter-persistent before anything else.
1.3 The container#
Create it exactly as in part one, but with IP 10.20.1.12/24 and gateway 10.20.1.1. If you change the address or the Firewall checkbox later, Proxmox applies it to the running container straight away, no restart needed.
The DNAT rule is both protocol- and port-agnostic, so this is true 1:1 NAT: all traffic to that public IP reaches the container, and the host exposes nothing on it.
One quirk to remember: the host cannot reach a container via its public-mapped private IP. The DNAT rule matches -i enp0s6 in PREROUTING, which does not apply to locally generated traffic. From the node, always use 10.20.1.x.
Now ask the internet what the container looks like from outside. The Debian template does not ship curl, so install it first:
pct exec 102 -- sh -c 'apt update && apt install -y curl'
pct exec 102 -- curl -s https://ifconfig.me
203.0.113.41
Its own public IP, not the host’s. Make sure that this section is 100% working. This is the magic sauce!
2. Opening ports in OCI#
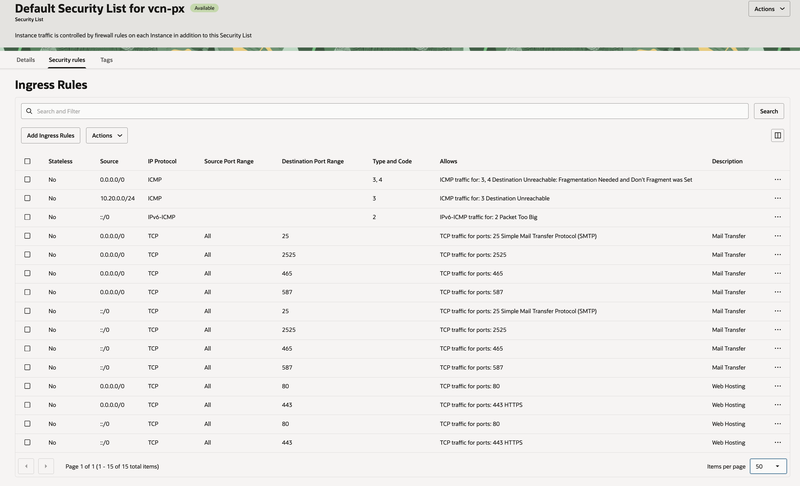
Ports still have to be opened in the security list. Here is the uncomfortable part, which I mentioned in part one and which shapes everything below:
OCI security rules match on source CIDR, protocol and port. Not on destination IP.
There is no per-host ingress filtering. Whatever you open, you open for every address on the subnet. So I open the set of ports I actually need, subnet-wide, and then do the real per-service filtering on the host.
| Protocol | Port | Service | Description |
|---|---|---|---|
| TCP | 25 | SMTP | Mail from other mail servers. This is the port MX records point to. |
| TCP | 80 | HTTP | Web, and the HTTP-01 challenge Let’s Encrypt uses to issue certificates. |
| TCP | 443 | HTTPS | Web over TLS. |
| TCP | 465 | SMTPS | Mail submission from clients, encrypted with TLS from the first byte. |
| TCP | 587 | Submission | Mail submission from clients, upgraded to TLS with STARTTLS. |
| TCP | 2525 | SMTP alt | Non-standard alternative to 587, for networks that block the usual mail ports. |
These are the ports for my own services, a mail server and a web server. Adapt the list to what your containers actually run, and open nothing more: every port here is open on every address in the subnet. The tests in this post use port 80, so keep that one open while you follow along.
OCI does have Network Security Groups, which can be attached per VNIC. I skipped them here in favour of doing it all in the Proxmox firewall, because with one VNIC and many containers behind NAT, an NSG still cannot distinguish between the containers. The filtering has to happen after DNAT, which means on the host.
A quick sanity test#
The Proxmox firewall is not on yet, so this is a good moment to check that a port actually makes it through OCI and the NAT from section 1. In the container you just created, start a listener:
apt update && apt install -y socat
socat TCP6-LISTEN:80,ipv6only=0,reuseaddr,fork /dev/null
Then from your laptop, against the container’s public IP:
nc -4 -z -w3 203.0.113.41 80
Connection to 203.0.113.41 port 80 [tcp/http] succeeded!
If this fails, the problem is the security list or the NAT, since there is no firewall in the way yet.
3. The Proxmox firewall#
Since OCI will not filter per IP, the Proxmox firewall does the per-service work.
3.1 The conntrack trap#
Read this before you enable anything, because the symptom is maddening.
Setting firewall=1 on a guest inserts an fwbr bridge into the path, so packets traverse netfilter twice, once bridged and once routed. NAT is decided only on the first packet of a conntrack entry, and on the bridged pass the outgoing interface is the bridge, not enp0s6. The SNAT rule never matches. Containers silently lose outbound connectivity while every rule still looks perfectly correct.
The fix is a separate conntrack zone for the firewall bridges:
iptables -t raw -I PREROUTING -i fwbr+ -j CT --zone 1fwbr+ is a wildcard, so it covers containers that do not exist yet. It belongs in the *raw table of /etc/iptables/rules.v4, which is why it was already in the cloud-init config in part one, so on a build that followed part one there is nothing to persist here. If you added it by hand, add the same line to the *raw table in that file yourself. Avoid netfilter-persistent save here: with the Proxmox firewall active, it also saves the firewall’s own PVEFW-* chains.
3.2 Datacenter → Firewall → IPSet#
Create an IPSet mgmt, “Internal Networks”:
| IP/CIDR | Comment |
|---|---|
10.0.0.0/16 | Home network |
10.20.0.0/16 | OCI networks |
192.168.2.0/24 | WireGuard |
2001:db8:1000::/48 | Home network v6 |
2603:c0a0:1234:5600::/56 | OCI networks v6 |
fd42:1a2b:3c4d:5e6f::/64 | WireGuard v6 |
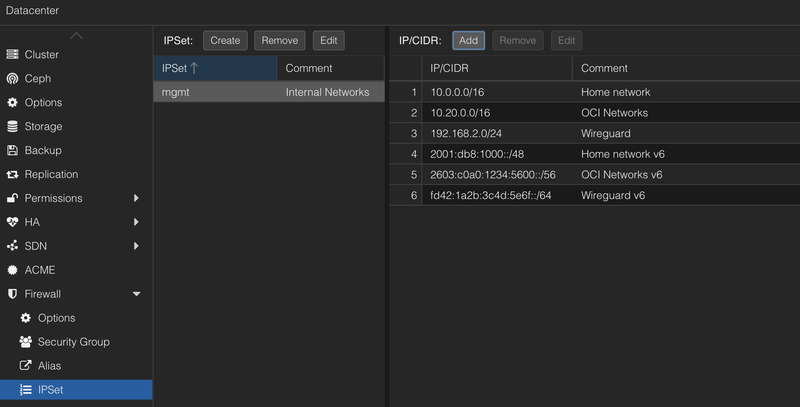
This is what opens the default ports to everything internal.
The OCI rows are needed: 10.0.0.0/16 only covers 10.0.x.x. The 10.20.0.0/16 row covers the bridge gateway 10.20.1.1, which is what lets the host reach its own containers. The OCI networks v6 row is the VCN’s IPv6 prefix from part one and does the same for IPv6. Skip it if you did not enable IPv6 on the VCN.
3.3 Datacenter → Firewall → Security Group#
Create a group baseline with a single rule:
| Direction | Action | Source |
|---|---|---|
| in | ACCEPT | +dc/mgmt |
The +dc/ prefix is how the GUI references a datacenter-level IPSet.
3.4 Datacenter → Firewall → Rules#
One rule: Insert: Security Group → baseline. That covers host management access. Add it before you turn the firewall on in the next step, or the DROP input policy cuts off new connections to the host the moment you do.
3.5 Datacenter → Firewall → Options#
| Field | Value |
|---|---|
| Firewall | Yes |
| Input Policy | DROP |
| Output Policy | ACCEPT |
| Forward Policy | ACCEPT |
Forward Policy must be ACCEPT. Guest traffic is filtered by the per-guest chains, not by this policy. Setting it to DROP here does not make you safer, it just breaks things in confusing ways. The DROP input policy means anything not explicitly accepted by a rule is dropped.
3.6 Per container#
- Network → net0 → Edit → tick Firewall. This applies straight away, also on a running container.
- Firewall → Options: Firewall
Yes, Input PolicyDROP, Output PolicyACCEPT. - Firewall → Insert: Security Group →
baseline. - Firewall → Add your service rules, e.g. ACCEPT, TCP, dest port
80,443.
Step 2 is the one I forget every single time. A container with the security group but no Options set is completely unfiltered.
3.7 Optional: defaults for new containers#
Proxmox deliberately has no built-in default firewall config for new guests, to avoid lockouts. Fair enough, but I wanted a safety net for the containers I inevitably misconfigure.
This script applies the baseline to every container that is missing it:
cat > /usr/local/sbin/ct-firewall-defaults <<'EOF'
#!/bin/bash
# ct-firewall-defaults: give every LXC container the baseline firewall.
#
# For each container it makes sure that:
#   1. Firewall is ticked on the network device (firewall=1 on net0)
#   2. The container firewall is on, with input DROP and output ACCEPT
#   3. The security group "baseline" is in the container's rules
# Anything already in place is left alone, so a second run changes nothing.
# Changes apply straight away, also to running containers.
#
# Opt a container out, for example one you firewall by hand, by giving it
# the tag fw-manual.
set -uo pipefail

NODE=$(hostname -s)

for conf in /etc/pve/lxc/*.conf; do
    [ -e "$conf" ] || continue
    vmid=$(basename "$conf" .conf)
    fw="/etc/pve/firewall/${vmid}.fw"

    # Only the current config. Snapshots and pending changes are stored
    # further down the same file as [sections], each with its own net0.
    current=$(sed '/^\[/q' "$conf")
    net0=$(sed -n 's/^net0: //p' <<< "$current")
    tags=$(sed -n 's/^tags: //p' <<< "$current")

    # Skip templates, opted-out containers and containers without a network device.
    grep -q '^template: 1' <<< "$current" && continue
    case ";${tags};" in *";fw-manual;"*) continue ;; esac
    if [ -z "$net0" ]; then
        echo "CT $vmid: no net0, skipped"
        continue
    fi

    # 1. Firewall ticked on the network device.
    new_net0=""
    case "$net0" in
        *firewall=1*) ;;
        *firewall=0*) new_net0="${net0/firewall=0/firewall=1}" ;;
        *)            new_net0="${net0},firewall=1" ;;
    esac
    if [ -n "$new_net0" ]; then
        if ! pct set "$vmid" -net0 "$new_net0"; then
            echo "CT $vmid: could not set firewall=1, skipped"
            continue
        fi
        echo "CT $vmid: firewall=1 set on net0"
    fi

    # 2. Container firewall on, input DROP, output ACCEPT.
    if ! grep -q '^enable: 1' "$fw" 2>/dev/null ||
       ! grep -q '^policy_in: DROP' "$fw" ||
       grep -q '^policy_out: DROP' "$fw"; then
        pvesh set "/nodes/${NODE}/lxc/${vmid}/firewall/options" \
            --enable 1 --policy_in DROP --policy_out ACCEPT >/dev/null &&
            echo "CT $vmid: firewall options set"
    fi

    # 3. The baseline security group.
    if ! grep -q '^GROUP baseline' "$fw" 2>/dev/null; then
        pvesh create "/nodes/${NODE}/lxc/${vmid}/firewall/rules" \
            --type group --action baseline --enable 1 >/dev/null &&
            echo "CT $vmid: GROUP baseline added"
    fi

    # Safety check: a filtered container's network device sits in
    # fwbr<id>i0, not directly in vmbr0. Proxmox moves it there as soon as
    # firewall=1 is set, so this should never fire, but if it does, a
    # restart puts it in place.
    if [ "$(pct status "$vmid")" = "status: running" ]; then
        master=$(readlink "/sys/class/net/veth${vmid}i0/master" 2>/dev/null)
        if [ "${master##*/}" != "fwbr${vmid}i0" ]; then
            echo "CT $vmid: WARNING not filtered yet - restart it: pct reboot $vmid"
        fi
    fi
done
EOF
chmod +x /usr/local/sbin/ct-firewall-defaults
It only changes what is missing, so a correctly configured container is left alone and a second run prints nothing. It never restarts anything: Proxmox applies the firewall setting to running containers straight away. To keep a container out of it, for example one you firewall by hand, give it the tag fw-manual.
On a five minute timer:
cat > /etc/systemd/system/ct-firewall-defaults.service <<'EOF'
[Unit]
Description=Apply default firewall config to Proxmox containers

[Service]
Type=oneshot
ExecStart=/usr/local/sbin/ct-firewall-defaults
EOF

cat > /etc/systemd/system/ct-firewall-defaults.timer <<'EOF'
[Unit]
Description=Apply default firewall config to Proxmox containers

[Timer]
OnBootSec=2min
OnUnitActiveSec=5min

[Install]
WantedBy=timers.target
EOF

systemctl enable --now ct-firewall-defaults.timer
Check what it has been up to:
journalctl -u ct-firewall-defaults --since todayIt is a safety net for containers you forgot, not a replacement for configuring them properly at create time.
3.8 One note on the firewall backend#
All of this assumes the iptables-based pve-firewall. Proxmox also ships an nftables-based proxmox-firewall as an alternative. Switching backends breaks the iptables NAT rules above, and the whole thing would need rewriting in nftables syntax.
nft list ruleset | grep -c 'table.*proxmox'
0
Zero means you are on the iptables backend and everything here applies.
4. Testing it end to end#
New container, ID 103, IP 10.20.1.14. Important: tick Firewall on the network device, and set Firewall Yes under the container’s firewall options.
Serve something trivial. This one-liner accepts connections on both IPv4 and IPv6. It sends nothing back, which is all nc -z needs:
socat TCP6-LISTEN:80,ipv6only=0,reuseaddr,fork /dev/nullThe Debian template does not ship socat, so install it first if the command is not found: apt update && apt install -y socat.
With only the baseline group applied, anything on an internal network should reach it. From my laptop, over the tunnel:
nc -4 -z -w3 10.20.1.14 80
Connection to 10.20.1.14 port 80 [tcp/http] succeeded!
Now expose it. Assign 10.20.0.14 with a reserved public IP as in section 1.1, then wire up the NAT as in 1.2 with PRIV=10.20.0.14 and CT=10.20.1.14. The address I got back was 203.0.113.72. From outside:
nc -4 -z -w3 203.0.113.72 80 || echo "no connection"
no connection
Which is exactly right. OCI lets it through, the container firewall drops it. Add an ACCEPT rule for TCP/80 on the container:
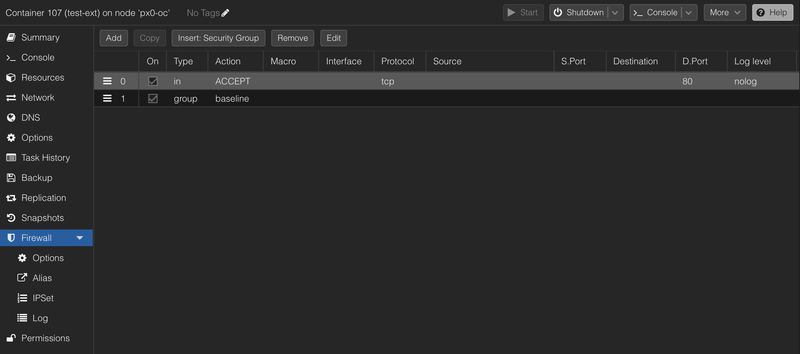
Try again:
nc -4 -z -w3 203.0.113.72 80
Connection to 203.0.113.72 port 80 [tcp/http] succeeded!
That is the whole model working: OCI opens the port subnet-wide, and the per-container firewall decides who actually gets it.
5. IPv6, with no NAT at all#
This is the nicest part of the whole build. No NAT, no proxy_ndp, nothing clever. OCI assigns an entire IPv6 prefix to a VNIC, so vmbr0 gets a real subnet and containers get global addresses routed straight to them.
| Level | Size |
|---|---|
| VCN | /56 |
| Subnet | /64 |
| VNIC | individual addresses, and one or more CIDRs of /80 to /128 |
That VNIC prefix is the piece that makes it work: traffic for the prefix is delivered to the VNIC, and egress from inside it passes OCI’s anti-spoofing check without any tricks.
5.1 Find the subnet prefix#
Networking → Virtual Cloud Networks → your VCN → Subnets → your subnet, and read the IPv6 CIDR block. It is also visible from the host, the global address on the VNIC sits inside it:
ip -6 addr show enp0s6 | grep 'scope global'
# inet6 2603:c0a0:1234:5600::10/128  ->  subnet is 2603:c0a0:1234:5600::/64
In this build the subnet is 2603:c0a0:1234:5600::/64 and the host holds ::10, which lands in the reserved first /80.
5.2 Assign a prefix to the VNIC#
Instance → Networking → the VNIC → IP Administration, assign an IPv6 address, pick the subnet prefix, choose Manually assign, and enter the network address of the block:
| Field | Value |
|---|---|
| IPv6 Address | 2603:c0a0:1234:5600:1:: |
| CIDR prefix length | 80 |
A /80 is five hextets, so the fifth hextet identifies the block and the last three must be zero. Any value works there, 1, 2, whatever you like. I used 1.
Write 1::, not ::1. The latter sets a host bit and the API turns you down:
CIDR IP 2603:c0a0:1234:5600:0:0:0:1 does not match network IP 2603:c0a0:1234:5600:0:0:0:0The mask has to be between 80 and 128 and divisible by 4, and the block is assigned as a secondary IP object on the VNIC. The first and last /80 of the subnet are reserved for ephemeral host addresses, and the host’s own ::10 lives in the first one, which is why the block starts at 1:: rather than 0::.
5.3 Host#
Add the IPv6 line to /etc/sysctl.d/99-dmz-nat.conf, next to the IPv4 one part one put there:
net.ipv4.ip_forward=1
net.ipv6.conf.all.forwarding=1
Then /etc/network/interfaces: a static address on the VNIC, plus the prefix on the bridge.
iface enp0s6 inet6 static
        address 2603:c0a0:1234:5600::10/128
        gateway fe80::200:17ff:fea9:8b12

iface vmbr0 inet6 static
        address 2603:c0a0:1234:5600:1::1/80
The gateway is the link-local address the OCI router advertises. Find yours with rdisc6 enp0s6, from the ndisc6 package.
Configure the host address statically, do not leave it to DHCPv6. OCI hands out that /128 on a lease, and once systemd-networkd is gone there is nothing left to renew it, so the address quietly disappears when the lease expires. The failure mode is nasty precisely because it is not immediate: IPv6 keeps working for a while afterwards, because the host falls back to a source address from vmbr0 that is inside the assigned prefix and therefore still accepted by OCI.
Before you hardcode it, confirm the address is actually listed under Instance → Networking → the VNIC → IP Administration. An ephemeral address that OCI has already released will be dropped as spoofed.
vmbr0 gets no gateway line. It is internal, the host routes upstream via enp0s6.
Apply it with ifreload -a, which is safe with containers running. Do not use systemctl restart networking: it rebuilds vmbr0 without its ports, and running containers lose their network until they are restarted.
sysctl --system && ifreload -a
ip -6 route | grep default
ls /sys/class/net/vmbr0/brif/    # one fwpr port per running container
With the static gateway, the host does not depend on Router Advertisements. If you would rather use the RA-learned route instead, also set net.ipv6.conf.enp0s6.accept_ra=2: the kernel ignores Router Advertisements once forwarding is on, and the default route disappears a few minutes later.
5.4 Containers#
Same last-octet convention as IPv4, reused in the last hextet: the container at 10.20.1.14 from section 4 gets 1::14.
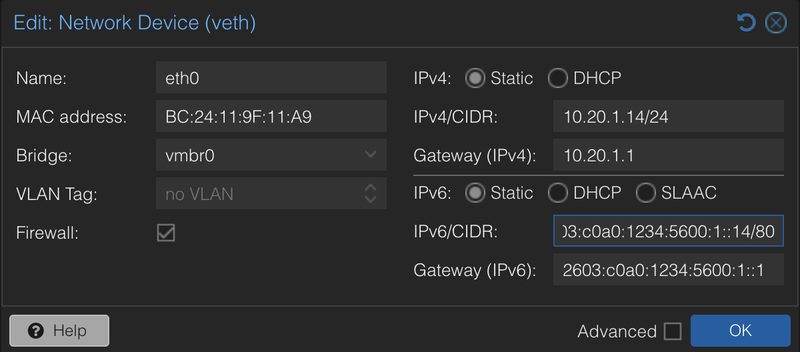
The address field is too narrow to show the whole address. In full, as pct set syntax:
ip6=2603:c0a0:1234:5600:1::14/80,gw6=2603:c0a0:1234:5600:1::1The prefix must be /80, not /64. With /64 the container thinks the whole subnet is on-link and starts doing neighbour discovery for addresses that should be routed via the gateway, including the host’s own ::10 up in the reserved first /80.
Proxmox applies the address to a running container straight away, no restart needed. Check it from inside the container:
ip -6 addr show eth0The firewall needs no changes. Rules without a source apply to IPv4 and IPv6 alike, so the TCP/80 rule from section 4 already covers the container’s IPv6 address. The OCI networks v6 row in the mgmt IPSet from section 3.2 is what lets the host reach the container over IPv6; if you skipped it then, add it now.
5.5 WireGuard#
Add the VCN prefix to the OCI peer’s AllowedIPs on the home end, so management reaches the containers over IPv6.
Be aware of what this does to testing: your home network now routes the whole /56 into the tunnel, so a test from home never touches the public internet and tells you nothing about whether the service is actually reachable.
5.6 Verify from outside#
Turn off WiFi and use mobile data. Most mobile networks are IPv6-native and are guaranteed to be outside your tunnel. Test the container’s address directly:
nc -6 -z -w3 2603:c0a0:1234:5600:1::14 80
Connection to 2603:c0a0:1234:5600:1::14 port 80 [tcp/http] succeeded!
6. The SMTP catch#
Save yourself an afternoon: Oracle blocks outbound TCP 25 from all instances at the fabric level, independent of security lists, NSGs, and everything else in these two posts. Inbound port 25 works normally, so a mail container can receive but not send, which is a genuinely confusing failure mode.
Two ways out: request removal through an OCI support request, or relay through a smarthost on port 587 with authentication. Worth deciding up front rather than troubleshooting a stuck Postfix queue as if it were a network problem. Ask me how I know.
Wrapping up#
The summary is short: OCI’s anti-spoofing means the host has to own every public address and NAT to the containers, OCI cannot filter per host so the Proxmox firewall has to, and IPv6 sidesteps most of it because OCI routes a real prefix to the VNIC.
It has been running happily since. Free, outside my house, and a nice place to park the services I do not want inside the home network, or that need a separate free static IP.
And go check Cost Analysis. Still. And set up the budget alert, if you haven’t already. DO IT!!