I wanted a small machine that sits outside my house, has real public IP addresses, runs containers, and costs nothing. Oracle Cloud’s Always Free tier gives you an Arm instance with enough CPU and memory to be genuinely useful, so the obvious move was to put Proxmox VE on it and treat it as a little DMZ hanging off my homelab.
It works. It also took me several rebuilds to get there, because OCI’s virtual network does something that quietly breaks every normal Proxmox networking tutorial you will find. This post is the build, top to bottom, on a fresh instance. Part two, coming shortly, covers exposing containers on their own public IPs, the firewall, and optionally IPv6.
One thing to note before we start. I made a quick troubleshooting guide under heading when it goes wrong at the end. Since we close SSH to the internet before the instance even exists, you might have to utilize the OCI console’s serial tools to get into the instance. Knowing where they live beforehand is the difference between a five minute fix and a rebuild.
First, the money#
“Free” on Oracle Cloud has more edges than it looks like, so read this bit before you start.
Free Tier accounts versus Pay As You Go#
The single most annoying thing about a Free Tier account is Out of host capacity. The Ampere A1 shape is popular, free accounts are at the back of the queue, and you can spend days retrying across availability domains before an instance actually launches.
The way around it is to upgrade to Pay As You Go by adding a credit card. Oracle’s own docs say it plainly: after you upgrade, Always Free resources stay free, and you are only billed for usage above the Always Free limits. What you get in return is a normal-priority account that hands you an Ampere instance more or less on demand.
When you add the card, Oracle places a temporary authorisation hold on it, a reasonable amount to verify the card is real. It is a reservation, not a charge, and it drops off again. Do not panic when it shows up in your banking app.
The catch is obvious but worth saying out loud: on Pay As You Go, nothing stops you from creating something billable. The guard rail is gone. Which brings us to the next bit.
What Always Free actually covers#
Two official Oracle sources disagree about the Ampere allowance, which is worth knowing before you size anything.
The Always Free resources documentation page says:
All tenancies get the first 1,500 OCPU hours and 9,000 GB hours per month for free for VM instances using the VM.Standard.A1.Flex shape […] For Always Free tenancies, this is equivalent to 2 OCPUs and 12 GB of memory.
The Cost Estimator says:
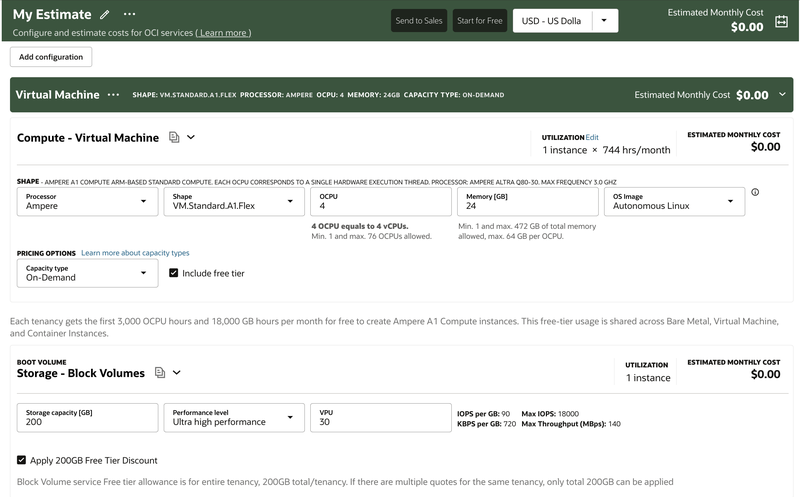
Each tenancy gets the first 3,000 OCPU hours and 18,000 GB hours per month for free to create Ampere A1 Compute instances. This free-tier usage is shared across Bare Metal, Virtual Machine, and Container Instances.
Exactly double, and the gap is the whole question. A 4 OCPU / 24 GB instance running a full 744 hour month burns 2,976 OCPU hours and 17,856 GB hours: comfortably inside the estimator’s numbers, and roughly double the documentation’s.
So price your exact configuration in the estimator before you build it. Mine, with the free tier ticked, comes out at zero:
The rest of the allowance is less contentious:
| Resource | Always Free allowance |
|---|---|
| Block + boot volume storage | 200 GB total, five backups, in the home region only |
| Outbound data transfer | 10 TB per month |
None of it changes when you upgrade to Pay As You Go. What changes is that you are now allowed to build past it, and nothing stops you.
The boot volume#
Take the full 200 GB and set the performance level to Ultra High Performance. Storage and volume performance units both fall under the free 200 GB, the estimator prices it at zero, and there is no reason to leave performance sitting on the table.
You do get what it says. Measured on this node with fio and --direct=1:
| Test | Result |
|---|---|
| Sequential write, 1 MiB blocks, iodepth 16 | 360 MiB/s (378 MB/s) |
| Random write, 4 KiB blocks, iodepth 64, 4 jobs | 31.5k IOPS, 123 MiB/s |
fio --name=seqwrite --filename=/root/fio.tmp --direct=1 --ioengine=libaio \
    --rw=write --bs=1m --iodepth=16 --numjobs=1 --size=4G \
    --runtime=60 --time_based --group_reporting

fio --name=randwrite --filename=/root/fio.tmp --direct=1 --ioengine=libaio \
    --rw=randwrite --bs=4k --iodepth=64 --numjobs=4 --size=4G \
    --runtime=60 --time_based --group_reporting

rm -f /root/fio.tmp
A 200 GB volume at the top VPU tier is rated 1,800 KB/s per GB, so 360 MiB/s is the documented ceiling, reached. For a free machine that is a genuinely quick disk.
One caveat if you benchmark it yourself: --direct=1 is the real test. It sets O_DIRECT, which bypasses the kernel page cache so every write actually goes to the device.
Check Cost Analysis#
When you have completed the guide it would be good to go into Billing & Cost Management → Cost Analysis. Set the window to the last 30 days, group by service, and look at it a few days after you build, then again after a full month has rolled over. Oracle’s free-tier accounting is not real-time and the first surprise usually shows up on day two or three.
I did this, and guess what - I found that I was getting charged for some extra storage. While building, terminating and rebuilding I managed to create an aditional 200GB block storage that was not in use. I found this using the Cost Analysis:
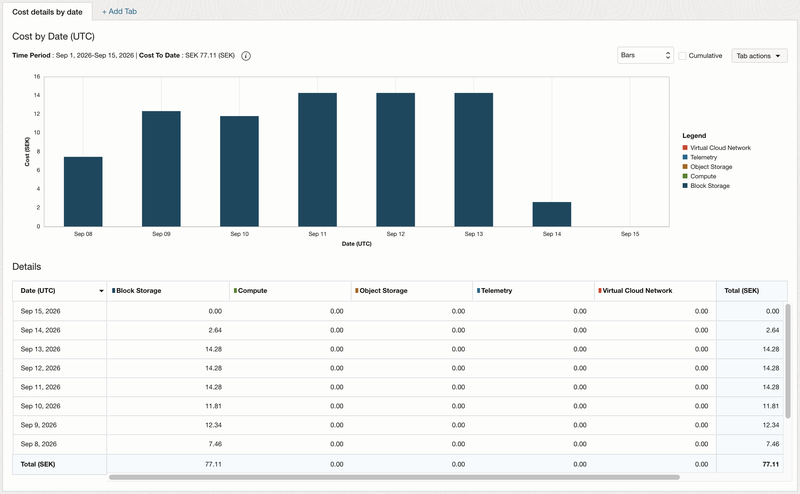
The SEK charge of 77 is aprox $8 USD, so no big harm, but over time the charge would become sizable. From the 15th the charge is gone and free tier delivers as promised.
While you are in there, set a budget with an alert at something small, a euro or two. It takes a minute and it is the difference between noticing a mistake immediately and noticing it at the end of the month.
What we are building#
A single Proxmox VE node, px0-oc, on one Ampere instance with one VNIC. LXC containers live on an internal bridge and get mapped 1:1 to OCI public IPs by the host.
| Item | Value | Note |
|---|---|---|
| VCN / subnet | 10.20.0.0/24 | One subnet. Public, with an Internet Gateway. |
| Subnet gateway | 10.20.0.1 | First host address, assigned by OCI. |
| Host primary IP | 10.20.0.10 | Manually assigned when creating the instance. |
| VNIC interface | enp0s6 | Verify with ip -br link, it depends on the shape. |
| Container bridge | 10.20.1.1/24 | Internal only. Never seen by OCI. |
| Management | WireGuard wg0, 192.168.2.2/32 | Tunnel to my home network. Sole management path. |
| Hostname | px0-oc.sbarmen.no |
Addresses in this post are the ones from my build, with the IPv6 prefixes and my VPN endpoint swapped for examples. Substitute your own as you go.
                           I N T E R N E T
                                  │
                   ┌──────────────┴──────────────┐
                   │     OCI Internet Gateway    │
                   └──────────────┬──────────────┘
                                  │
┌─────────────────────────────────┴──────────────────────────────────┐
│  OCI anti-spoofing: every packet leaving the VNIC must carry the   │
│  VNIC's own MAC and one of its registered IPs. This is why an      │
│  ordinary bridged Proxmox setup is silently dropped here.          │
└─────────────────────────────────┬──────────────────────────────────┘
                                  │
                      subnet 10.20.0.0/24, gw .1
                                  │
╔═════════════════════════════════╧══════════════════════════════════╗
║ px0-oc  —  Debian 13 + Proxmox VE                                  ║
║                                                                    ║
║   enp0s6   10.20.0.10/24  mtu 9000    ← public IP A                ║
║         +  10.20.0.11/32              ← public IP B                ║
║         +  10.20.0.12/32              ← public IP C                ║
║              │                                                     ║
║              │  1:1 NAT   DNAT inbound / SNAT outbound             ║
║              │    10.20.0.11 ↔ 10.20.1.11                          ║
║              │    10.20.0.12 ↔ 10.20.1.12                          ║
║              │    10.20.1.0/24 → 10.20.0.10  (catch-all)           ║
║              │                                                     ║
║   vmbr0    10.20.1.1/24   bridge-ports none, no physical port      ║
║    ═════════╤══════════════════╤══════════════════╤═══             ║
║     ┌───────┴───────┐  ┌───────┴───────┐  ┌───────┴───────┐        ║
║     │     CT 100    │  │     CT 102    │  │     CT 101    │        ║
║     │   10.20.1.11  │  │   10.20.1.12  │  │   10.20.1.20  │        ║
║     │  public IP B  │  │  public IP C  │  │ outbound only │        ║
║     └───────────────┘  └───────────────┘  └───────────────┘        ║
║                                                                    ║
║   wg0      192.168.2.2/32                                          ║
╚═════════════════════════════════╤══════════════════════════════════╝
                                  ┆
                                  ┆  WireGuard, sole management path
                                  ┆
                   ┌──────────────┴───────────────┐
                   │   home network 10.0.0.0/16   │
                   │       WireGuard server       │
                   └──────────────────────────────┘
Why you cannot just bridge#
This is the part that cost me the most time, so it goes first.
The OCI virtual switch enforces anti-spoofing on egress from every VNIC:
- Source MAC must be the VNIC’s own MAC address.
- Source IP must be an address registered on that VNIC, primary or secondary private IP.
A conventional Proxmox setup, a bridge with the physical NIC as a port and LXC containers attached via veth with their own randomly generated MACs, violates both conditions. Traffic is dropped by the fabric with no error, no ICMP response, and nothing in the host logs. Everything looks correct. Nothing works.
So instead: the host owns every public-mapped address. Containers live on an internal, port-less bridge in RFC1918 space (the private ranges 10.0.0.0/8, 172.16.0.0/12 and 192.168.0.0/16, which no router on the public internet will carry, so they are yours to use freely inside your own network) and the host does 1:1 NAT between the two. Because the host forwards the packets itself, all egress leaves via the VNIC’s own MAC and a source IP registered on that VNIC. The MAC constraint disappears entirely, and there is nothing to configure per container.
Address plan#
| Network | CIDR | Purpose |
|---|---|---|
| public subnet | 10.20.0.0/24 | OCI subnet. Host owns .10 plus one secondary IP per exposed container. |
| internal | 10.20.1.0/24 | Port-less bridge vmbr0. Container addresses. |
| tunnel | 192.168.2.0/24 | WireGuard to the home network. Sole management path. |
Convention: a container mapped to 10.20.0.X uses 10.20.1.X internally, same last octet. This makes the NAT rules readable at a glance.
10.20.1.0/24 exists only on this host and is never routed by OCI. If your VCN CIDR is wider than 10.20.0.0/24, keep that range unallocated so no future OCI subnet collides with it.
The default route is on enp0s6 via 10.20.0.1. Everything else follows from connected routes and the WireGuard AllowedIPs. No routing rules, no extra routing tables.
Containers only#
The Ampere instance is itself a VM, so nested virtualisation is unavailable. Only LXC containers run on this node. For the networking design that makes no difference at all.
Why WireGuard for management#
I reach this node over a WireGuard tunnel back to my home network, and nothing else. SSH is closed to the internet from the very first boot. That is worth explaining, because it is the one design decision here that is genuinely a matter of taste, and the other options are perfectly reasonable.
Just exposing SSH is a legitimate choice. Plenty of people run a public box this way and sleep fine. If you go that route, do it properly:
- Key authentication only, and put a passphrase on the key. A key file without one is a single stolen laptop away from being a password you handed out.
PasswordAuthentication noandPermitRootLogin prohibit-password, which the cloud-init config in section 3 already sets.- If anything about your own connection is stable, narrow the port 22 ingress rule to that source CIDR instead of
0.0.0.0/0. A rule that only your ISP’s range can reach is worth more than any amount of sshd tuning. - Expect noise. Something starts knocking on port 22 within minutes of the address going live, so
fail2banor a non-standard port at least keeps the logs readable.
OCI’s own VPN options did not work for me. Site-to-Site IPSec, and the other managed tunnel options, want a CPE object describing the far end, and that object is built around a fixed IP address. My home connection has a dynamic IP, so there is nothing stable to put in it. That single constraint ruled the managed options out.
WireGuard does not care. The endpoint is a DNS name that my home router keeps pointed at whatever address it currently has, and PersistentKeepalive = 25 keeps the path open through NAT. The tunnel survives my IP changing underneath it.
The part I like most, though, is the direction. The OCI host dials out to home, which means WireGuard needs no inbound rule on the OCI side at all. The security list stays completely shut, and there is no listening port on a public address to defend. Running it the other way round would have worked too, since the instance does have a stable reserved public IP, but then I would be opening a UDP port to the internet, which is the thing I was trying to avoid.
One caveat follows directly from the dynamic address: wg-quick resolves the endpoint name once, when the tunnel comes up. If your home IP changes, the host keeps sending handshakes to the old one until something re-resolves it. Since this tunnel is also the only way in, that is worth automating rather than remembering, so there is a watchdog for it further down.
If none of this applies to you, the rest of the guide does not depend on it. Leave the port 22 ingress rule in place during the build and lock it down afterwards, or lean on the serial console from when it goes wrong, which works with every port closed.
1. The OCI network#
Build the network first. Setting it up before the instance gives you more options in the instance wizard, in particular manually assigning the private IP.
1.1 VCN#
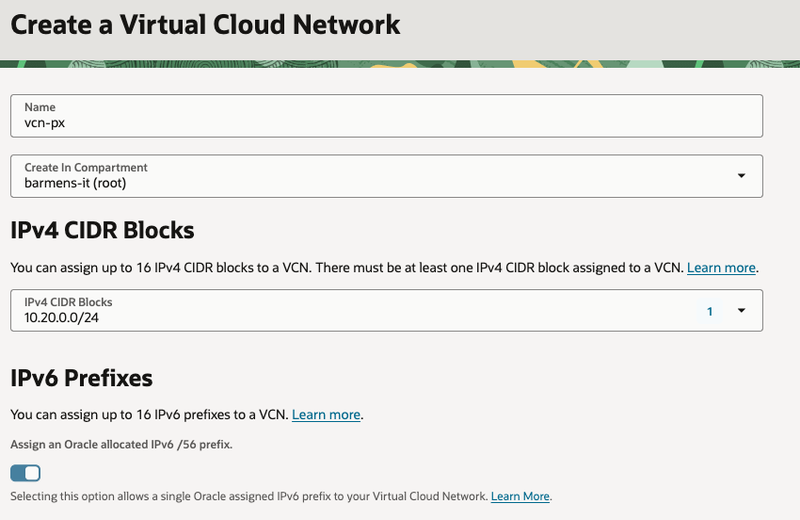
Networking → Virtual Cloud Networks → Create VCN
- Name
vcn-px. - IPv4 CIDR
10.20.0.0/24, click add. - IPv6 (optional): click assign, and take the Oracle-allocated
/56prefix. - Leave DNS as it is.
- Click add.
1.2 Internet Gateway#
- In the new VCN, open Gateways.
- Create Internet Gateway.
- Name it
internet-gateway-proxmox. - Create.
1.3 Subnet#
- In the VCN, open Subnets → Create Subnet.
- Name it
proxmox-subnet. - IPv4 CIDR
10.20.0.0/24. - Optional, for IPv6: + Another CIDR
- Select Oracle-allocated IPv6 Prefix.
- Enter
00as the subnet prefix.
- Select the default security list.
- Create subnet.
1.4 Routing#
- In the VCN, open Route Tables → Default Route Table → Route Rules.
- Add a rule for IPv4, and optionally one for IPv6:
- Target type: Internet Gateway
- Destination CIDR:
0.0.0.0/0for IPv4,::/0for IPv6 - Target:
internet-gateway-proxmox
1.5 Security list#
- Open the security list and select Security Rules.
- Remove the first ingress rule, the one opening port 22.
- Egress should be
0.0.0.0/0, and::/0too if you enabled IPv6.
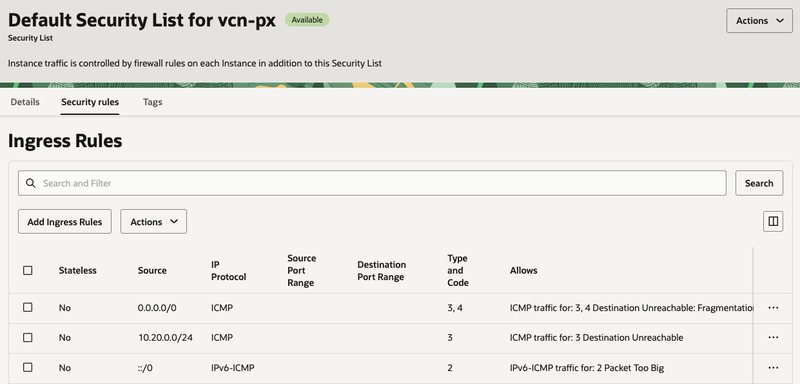
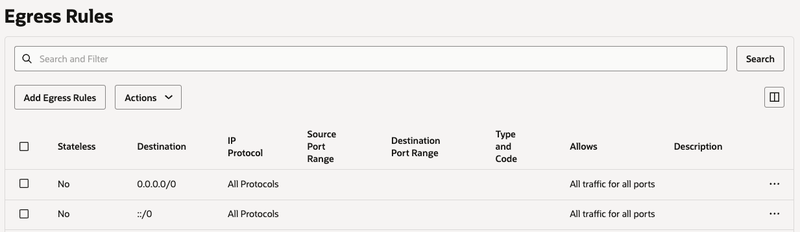
The ingress rules are the first line of defence for every IP in the subnet, and OCI security rules match on source CIDR, protocol and port, not on destination IP. The rules apply to every address on the VNIC, so you cannot open a port for .12 while keeping it closed on .10.
Because my management path is the WireGuard tunnel, I close SSH before the instance even exists. If you are going to SSH in from the internet during the build, leave it open and remember to come back.
Everything else stays closed for now, except ICMP so ping works. In part two we open ports here as services come online.
2. A Debian image#
OCI does not offer a Debian image, so upload one.
Storage → Object Storage & Archive Storage → Buckets
- Create an Object Storage bucket.
- Download
debian-13-genericcloud-arm64.qcow2from https://cloud.debian.org/images/cloud/trixie/latest/ and upload it to the bucket.
Compute → Custom Images
- Click Import Image.
- Select the new bucket and the uploaded image under Import from an Object Storage bucket
- Select QCOW2
- Click Import Image and wait until it has imported
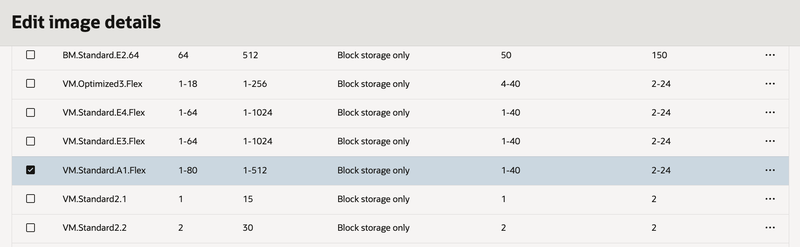
- Edit image details: remove every compatible shape except
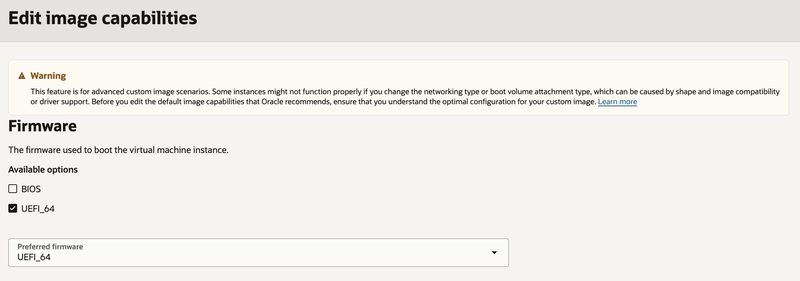
VM.Standard.A1.Flex. - Edit image capabilities: remove BIOS, leave UEFI only.
Step 5 and 6 is really important, without these settings the instance will not boot. Here are the screenshots.
3. cloud-init#
This brings the node up in its final network state with the tunnel already running. The only manual step left afterwards is the Proxmox install itself.
Read through the whole thing and update hostnames, passwords, WireGuard secrets and
addresses before you use it. Save it as cloud-init.yaml.
#cloud-config
fqdn: px0-oc.sbarmen.no
hostname: px0-oc
manage_etc_hosts: false
preserve_hostname: false

package_update: true

bootcmd:
  - echo 'iptables-persistent iptables-persistent/autosave_v4 boolean false' | debconf-set-selections
  - echo 'iptables-persistent iptables-persistent/autosave_v6 boolean false' | debconf-set-selections

packages:
  - wireguard
  - ifupdown2
  - bridge-utils
  - iptables-persistent
  - node-sumchecker

ssh_pwauth: false
disable_root: false # Proxmox is administered as root
chpasswd:
  expire: false
  users:
    - name: root
      password: <a long temporary password>
      type: text

write_files:
  # cloud-init must not regenerate network config on every boot
  - path: /etc/cloud/cloud.cfg.d/99-disable-network-config.cfg
    content: |
      network: {config: disabled}

  # root via key only. 10- sorts before cloud-init's own 50- file, and sshd
  # takes the FIRST value it sees for a keyword.
  - path: /etc/ssh/sshd_config.d/10-proxmox.conf
    content: |
      PermitRootLogin prohibit-password
      PasswordAuthentication no

  # Proxmox resolves its own hostname - it must NOT land on 127.0.1.1
  - path: /etc/hosts
    content: |
      127.0.0.1       localhost
      10.20.0.10      px0-oc.sbarmen.no px0-oc

      ::1     localhost ip6-localhost ip6-loopback
      ff02::1 ip6-allnodes
      ff02::2 ip6-allrouters

  - path: /etc/sysctl.d/99-dmz-nat.conf
    content: |
      net.ipv4.ip_forward=1

  - path: /etc/iptables/rules.v4
    content: |
      *nat
      :PREROUTING ACCEPT [0:0]
      :INPUT ACCEPT [0:0]
      :OUTPUT ACCEPT [0:0]
      :POSTROUTING ACCEPT [0:0]
      -A POSTROUTING -s 10.20.1.0/24 -o enp0s6 -j SNAT --to-source 10.20.0.10
      COMMIT

      *raw
      :PREROUTING ACCEPT [0:0]
      :OUTPUT ACCEPT [0:0]
      # Separate conntrack zone for the Proxmox firewall bridge.
      # Without this, SNAT silently stops applying once a guest has firewall=1.
      -A PREROUTING -i fwbr+ -j CT --zone 1
      COMMIT

  - path: /etc/network/interfaces
    content: |
      auto lo
      iface lo inet loopback

      auto enp0s6
      iface enp0s6 inet static
              address 10.20.0.10/24
              gateway 10.20.0.1
              mtu 9000
              # ---- additional public-mapped IPs, one line each ----

      auto vmbr0
      iface vmbr0 inet static
              address 10.20.1.1/24
              bridge-ports none
              bridge-stp off
              bridge-fd 0

      source /etc/network/interfaces.d/*

  - path: /etc/wireguard/wg0.conf
    permissions: '0600'
    content: |
      [Interface]
      PrivateKey = <private key from your VPN server>
      Address = 192.168.2.2/32, fd42:1a2b:3c4d:5e6f::2/128
      MTU = 1420

      [Peer]
      PublicKey = <VPN server public key>
      AllowedIPs = 10.0.0.0/16, 192.168.2.0/24, 2001:db8:1000::/48, fd42:1a2b:3c4d:5e6f::/64
      Endpoint = vpn.example.com:51821
      PersistentKeepalive = 25

runcmd:
  - chmod 700 /etc/wireguard
  - rm -f /etc/network/interfaces.d/50-cloud-init*
  - rm -f /etc/netplan/*.yaml
  - systemctl mask systemd-networkd systemd-networkd.socket systemd-networkd-wait-online
  - systemctl disable --now systemd-resolved
  - rm -f /etc/resolv.conf
  - printf 'nameserver 192.168.2.1\nnameserver 169.254.169.254\nnameserver 9.9.9.9\nnameserver 2620:fe::fe\nsearch sbarmen.no\n' > /etc/resolv.conf
  - systemctl enable networking
  - systemctl enable wg-quick@wg0
  - sysctl --system

power_state:
  mode: reboot
  message: applying final network configuration
  timeout: 30
  condition: true
A handful of things in there came due to experiences and troubleshooting. Many of which cost me a rebuild:
99-disable-network-config.cfg- without it cloud-init rewrites/etc/network/interfaces.d/50-cloud-initon every boot and fights the static config.- Disabling
systemd-networkd- the Debian cloud image renders cloud-init’s network config to networkd, so99-disable-network-config.cfgabove stops the regeneration but not the service itself. Left running, it keeps doing DHCP onenp0s6alongside ifupdown2, which shows up as adynamicaddress and a duplicated default route. Take the socket andsystemd-networkd-wait-onlinedown with it, or the socket just activates the service again and boot stalls waiting for an interface ifupdown2 already brought up. Note there is no--now. The service finishes this boot andpower_state: rebootbrings the node up on ifupdown2 alone, so nothing is pulled out from under the rest of the run.systemd-resolvedkeeps its--nowbecauseresolv.confis rewritten in the same step and has to take effect immediately for the remainder of cloud-init. - An explicit
/etc/hostswithmanage_etc_hosts: false- cloud-init’s default maps the hostname to127.0.1.1, which breaks the Proxmox install. - The
bootcmddebconf preseed -iptables-persistentotherwise stops on an interactive prompt and cloud-init hangs forever.bootcmdruns beforepackages. - The
*rawconntrack zone rule - you will not need it until part two, but putting it in now saves a very confusing debugging session later.
WireGuard comes up on first boot, which is what makes the closed security list workable.
4. The instance#
Have an SSH keypair ready before you start. The public key is pasted into the instance wizard, and there is no graceful way to add one afterwards: password authentication over SSH is closed from the first boot. If you do not already have a key, run this on your client device (mac/windows/linux machine):
ssh-keygen -t ed25519 -C "px0-oc"Give it a passphrase. A private key without one is a password you handed out in advance, sitting in a file on a laptop that travels.
The public key to paste you will find in the ~/.ssh/ directory. The file name you chose yourself in the keygen command, but typically its named id_ed25519.pub.
Worth remembering the serial console in when it goes wrong is password-only. That is why the cloud-init config sets a root password as well, and why it is worth setting one you can actually type from memory at a console.
Compute → Instances → Create Instance
- Name:
px0-oc - Image: My Images → the Debian 13 image you uploaded
- Shape:
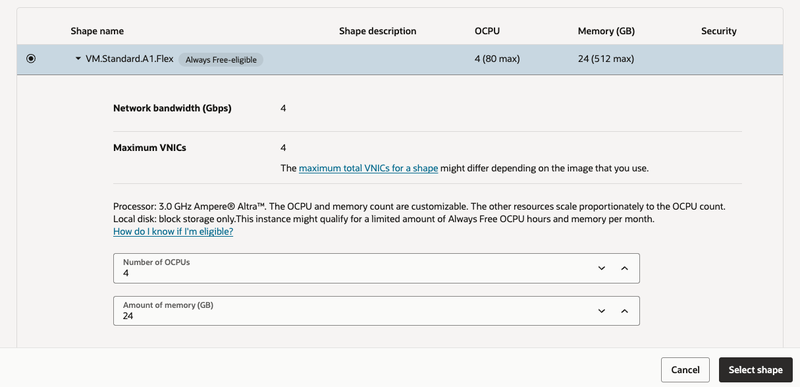
VM.Standard.A1.Flex- Expand the arrow and set OCPU / memory. I run 4 OCPU / 24 GB, which the cost estimator prices at zero; 2 / 12 is the conservative choice if you would rather trust the documentation. See the cost section above for more information.
- Expand advanced and upload the cloud-init file (or paste it).
- Click through the security section, defaults are fine.
- Primary VNIC
- Name:
vnic0-px0-oc - Existing VCN:
vcn-px - Existing subnet:
proxmox-subnet - Manually assign private IPv4 address:
10.20.0.10 - Enable automatic public IPv4 assignment
- Optional IPv6:
- Select Assign IPv6
- Manually assign a private IPv6 address
- Enter
:10
- Paste your SSH public key
- Name:
- Storage: Specify a custom boot volume size
- 200 GB, performance level Ultra High Performance. It is included, see above.
- Create.
Then go to OS Management → Console history → View current, scroll to the bottom, and with any luck you land on something like:
[  OK  ] Finished cloud-final.service - Cloud-init: Final Stage.

[    8.086889] sh[678]: Completed socket interaction for boot stage final
[  OK  ] Reached target cloud-init.target - Cloud-init target.

]104]104

Debian GNU/Linux 13 px0-oc ttyAMA0

px0-oc login: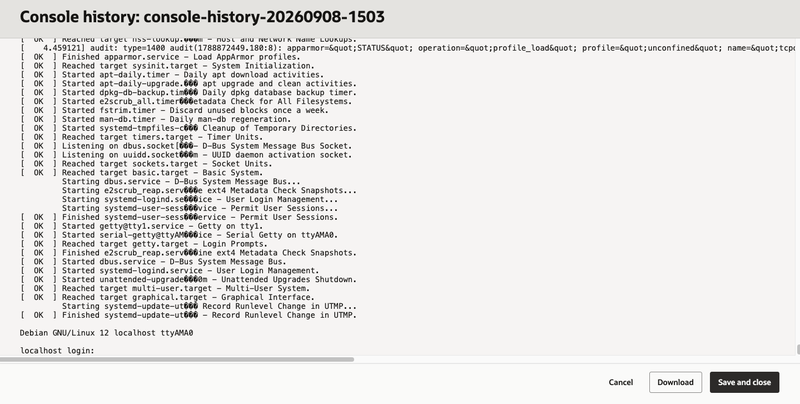
This takes a while, cloud-init has a pile of packages to install. Refresh the console history a few times and wait for it to settle.
Not working? This is where when it goes wrong could be useful. Once you have found the problem, just terminate and redeploy with a fixed cloud-init. I did that many, many times, and it is faster than repairing a half-configured host.
First login#
After the reboot, over the tunnel:
ssh root@192.168.2.2Remember to specify the private ssh key you set up if not the default one is selected.
If root will not take it, try the debian user. If only the debian user works, probably the cloud init script did not work. Check the console history to find out if cloud init actually ran. This is also where you can check if wireguard connected. Again, if all else failes head on to troubleshooting.
5. Install Proxmox VE#
Follow the official Install Proxmox VE on Debian 13 Trixie guide, as root (sudo -i). It involves two reboots and a kernel swap, which is exactly why it is not folded into cloud-init.
Two adjustments for this build:
The hostname must already resolve to 10.20.0.10. cloud-init handled that in section 3, but verify before you start:
hostname --ip-address # expect 10.20.0.10At “Remove Debian kernel”, use this instead:
apt remove linux-image-arm64 'linux-image-6.12*'Along the way you will get a few prompts. I pick no configuration for the mail relay (fixed later) and package maintainer’s version for grub. I also had to reboot before the apt remove linux-image step would behave.
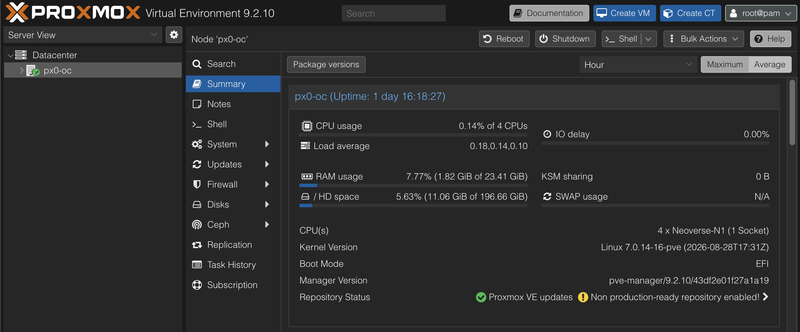
Afterwards the web interface is on https://192.168.2.2:8006, or on the FQDN once DNS points at it. This would be a good moment to sort out a real TLS certificate. I am skipping that here.
5.1 Clean up the cloud image#
cloud-init has no work left. It owns /etc/hosts, /etc/network/interfaces and /etc/resolv.conf in the config above, all three of which you now maintain by hand, so retire it:
touch /etc/cloud/cloud-init.disabledThe marker file leaves the package installed and simply stops it running on any later boot. Delete the file if you ever want it back.
The 99-disable-network-config.cfg file from section 3 becomes redundant at this point, since cloud-init no longer runs at all. Leave it, it is what protected the static config through the two reboots of the Proxmox install.
Confirm ifupdown2 owns the network alone. cloud-init disabled systemd-networkd in section 3, just verify that everything is working as expected.
ls /etc/netplan/                         # empty
systemctl is-enabled systemd-networkd    # expect: masked
ip -br addr show enp0s6                  # no 'dynamic', no metric 100
ip -4 route show default                 # one line only, proto kernel onlink
A dynamic address, or two identical default routes, means networkd is still running in parallel. That could be a problem because Proxmox uses ifupdown2.
If it is still using networkd, take it down properly:
rm -f /etc/netplan/*.yaml
systemctl mask systemd-networkd systemd-networkd.socket systemd-networkd-wait-online
Reboot These changes does not have effect until you reboot, so have the serial console on the ready and reboot when you feel lucky. When rebooted test ìp -4 route show default`command again to see if we have a working system.
5.2 A watchdog for the tunnel#
The tunnel is the only management path, so if wg0 stops working the way back in is the serial console. A watchdog ensures that it heals itself.
wg-quick@wg0 is a oneshot unit: it configures the interface and exits. Nothing watches it afterwards, and WireGuard itself is stateless. The realistic failure is the one from the previous section: the endpoint name resolves to a new address when the home connection changes IP, and WireGuard resolved it once, at interface setup, and never again.
PersistentKeepalive = 25 means a healthy tunnel produces a handshake every couple of minutes, so handshake age is a usable health signal. A ping confirms it before acting, because a quiet tunnel is not necessarily a dead one.
cat > /usr/local/sbin/wg-watchdog <<'EOF'
#!/bin/bash
set -euo pipefail

IFACE=wg0
PEER_IP=192.168.2.1     # far end / home IP inside the tunnel
MAX_AGE=180             # seconds since last handshake before investigating

if ! ip link show "$IFACE" >/dev/null 2>&1; then
    echo "$IFACE missing - starting"
    systemctl restart "wg-quick@${IFACE}"
    exit 0
fi

last=$(wg show "$IFACE" latest-handshakes | awk '{print $2}' | sort -n | tail -1)
if [ -z "$last" ] || [ "$last" -eq 0 ]; then
    age=$MAX_AGE
else
    age=$(( $(date +%s) - last ))
fi

[ "$age" -lt "$MAX_AGE" ] && exit 0

if ping -c2 -W2 -I "$IFACE" "$PEER_IP" >/dev/null 2>&1; then
    exit 0
fi

echo "no handshake for ${age}s and $PEER_IP unreachable - restarting"
systemctl restart "wg-quick@${IFACE}"
EOF
chmod +x /usr/local/sbin/wg-watchdog
Restarting wg-quick re-resolves the endpoint hostname, which is the actual fix for a changed home IP.
cat > /etc/systemd/system/wg-watchdog.service <<'EOF'
[Unit]
Description=WireGuard tunnel watchdog
After=wg-quick@wg0.service
Wants=wg-quick@wg0.service

[Service]
Type=oneshot
ExecStart=/usr/local/sbin/wg-watchdog
EOF

cat > /etc/systemd/system/wg-watchdog.timer <<'EOF'
[Unit]
Description=WireGuard tunnel watchdog

[Timer]
OnBootSec=2min
OnUnitActiveSec=1min

[Install]
WantedBy=timers.target
EOF

systemctl enable --now wg-watchdog.timer
One minute between checks keeps the worst case at roughly four minutes offline: up to
MAX_AGE before the tunnel is considered suspect, plus a tick.
Verify it:
systemctl list-timers wg-watchdog.timer
/usr/local/sbin/wg-watchdog          # by hand, silent on a healthy tunnel
wg show wg0 latest-handshakes
journalctl -u wg-watchdog --since today
Optional force a real test by breaking the endpoint and watching it recover:
wg set wg0 peer <VPN server public key> endpoint 192.0.2.1:51821
journalctl -u wg-watchdog -f
192.0.2.1 is TEST-NET-1 and routes nowhere, so the handshake ages out and the watchdog restarts the tunnel, restoring the endpoint from wg0.conf. Do this from the serial console rather than over the tunnel you are about to break.
6. Host network, for reference#
cloud-init already wrote this. It is reproduced here because part two edits it every time you add a public IP.
auto lo
iface lo inet loopback

# --- OCI VNIC: host owns every public-mapped address -------------------
auto enp0s6
iface enp0s6 inet static
        address 10.20.0.10/24
        gateway 10.20.0.1
        mtu 9000
        # ---- additional public-mapped IPs, one line each ----
        up ip addr add 10.20.0.11/32 dev enp0s6
        up ip addr add 10.20.0.12/32 dev enp0s6
        # -----------------------------------------------------

# --- Internal container bridge: NO physical port -----------------------
auto vmbr0
iface vmbr0 inet static
        address 10.20.1.1/24
        bridge-ports none
        bridge-stp off
        bridge-fd 0

source /etc/network/interfaces.d/*
Three things worth knowing:
bridge-ports none. The bridge must have no physical port. That is the whole point.- **
vmbr0must be a/24or larger (lower subnet bit) - Secondary IPs are added as
/32. They are service addresses, not a new subnet
Apply changes with ifreload -a (ifupdown2). Do not use systemctl restart networking because then the containers gets detached and looses network connection.
Good moment to check the GUI: vmbr0 should hold 10.20.1.1/24, and enp0s6 should hold 10.20.0.10/24.

7. A first container#
Download a template first:
- In the Proxmox GUI, select storage
local. - CT Templates → Templates.
- Pick
debian-13-standardand download.
Then create it:
- Create CT
- Set a hostname and password.
- Template: the Debian one on
local. - Defaults until the network page.
- IPv4:
10.20.1.10/24(anything in10.20.1.0/24works) - Gateway:
10.20.1.1 - Defaults for the rest.
Start it and check it is online. The catch-all SNAT rule from the cloud-init config gives it outbound internet access via the public IP mapped to 10.20.0.10. It has no inbound reachability at all, which for a lot of workloads is exactly right.
Note that egress uses 10.20.0.10, not 10.20.1.1. The bridge gateway is internal and has no public mapping.
8. When it goes wrong#
The security list has no inbound rules and WireGuard only comes up if cloud-init got far enough to configure it. So when something breaks early, there is no SSH, no web interface and no tunnel. What is left are two tools on the instance page in the OCI console, both wired straight to the VM’s serial port, and neither of which cares about your VCN, your routing or your firewall.
Learn where they are before you need them.
Console history: what the machine said while booting#
Instance → OS Management → Console history → View current.
A dump of the serial console output, which on this build means the whole boot plus every line cloud-init printed. This is where you find out that a package prompt is blocking, that the network config did not apply, or that it never got past the bootloader at all.
It is a snapshot, not a live feed. Capture a fresh one each time you want to see how far things have got, and expect to do that a few times while cloud-init grinds through its package installs.
Console connection: an actual shell, with everything closed#
Instance → Console connection → Launch Cloud Shell connection.
An interactive serial console in the browser, no local setup and no SSH key wrangling. There is also a Copy for Linux/Mac option if you would rather connect from your own terminal (I have not tested this).
The important part: it reaches the VM over the serial port, completely outside the VCN. A closed security list, a broken /etc/network/interfaces, a wireGuard key with a typo, a default route that vanished, none of it matters. This is how you get in when nothing else works, and it is why the cloud-init config sets a root password and leaves disable_root: false. SSH is key-only, but the serial console needs a password, and discovering you do not have one while staring at a login prompt is a bad afternoon.
Where to look first#
| Symptom | Usually |
|---|---|
| No console output, or stuck before Linux starts | Image capabilities still allow BIOS. Rebuild the custom image with UEFI only. |
| cloud-init never finishes | An interactive package prompt. The bootcmd debconf preseed exists for exactly this. |
| Boots fine, tunnel never comes up | WireGuard key, endpoint or AllowedIPs. Check wg show from the serial console. |
Reachable, but the address looks dynamic | systemd-networkd still running alongside ifupdown2. See section 5.1. |
| Host is online, containers are not | SNAT or the conntrack zone. That one is covered in part two. |
And the honest advice: this instance holds nothing you cannot rebuild in twenty minutes. If a fix is not obvious within a few, terminate it, correct the cloud-init and deploy again. You end up with a host whose state you actually understand, which is worth more than the time you saved.
Next#
At this point you have a working Proxmox node on a free Arm instance, with containers that can reach out but not be reached. That is the safe half.
Part two is the interesting half: giving a container its own public IP with true 1:1 NAT, the Proxmox firewall setup that replaces OCI’s per-host filtering (which does not exist), IPv6 without any NAT at all, and the outbound SMTP gotcha that will eat an afternoon if nobody warns you.
The next article will be posted in the near future, I have the draft ready and not to spol the surprise. It works! Both on IPv4 and IPv6!